How I Prepare Pictures for the Web With Photoshop
Date: 07/24/19; Version 15
I used Adobe Photoshop to create graphics for web pages starting in 1994. I switched to Affinity Photo on the Macintosh in 2019 when Adobe insisted on selling Photoshop as subscription-only.
![]() Adobe Photoshop is an incredible program.
It's the tool of choice for many different kinds of image creation.
Preparing pictures for the web is just one of its many functions, and for that purpose, most of its hundreds of controls won't help,
but will in fact make your picture look worse.
To make your picture look better, you need only a few of Photoshop's capabilities.
Adobe Photoshop is an incredible program.
It's the tool of choice for many different kinds of image creation.
Preparing pictures for the web is just one of its many functions, and for that purpose, most of its hundreds of controls won't help,
but will in fact make your picture look worse.
To make your picture look better, you need only a few of Photoshop's capabilities.
Here is the path through Photoshop that I follow when putting pictures on the Web, starting from either a scanned image or a digital camera picture. I am sure there are many more things I could do, if I understood Photoshop better, but this procedure is what I have learned so far, by trial and error.
(I use Adobe Photoshop CS5 but most of these notes apply to earlier versions too.)
(If you're a Linux user, you can adapt these instructions to The Gimp. But I like the real Photoshop a lot better.)
Adobe Pricing
Adobe no longer sells Photoshop as a regular Macintosh app. Now you buy a yearly subscription, and Adobe updates Photoshop with fixes and new features whenever it feels like it. If you are a retired person on a fixed budget, you will see a substantial hit. If you stop buying the subscription, Photoshop will no longer work for you. I am very disappointed in this approach.
I looked at ![]() Affinity Photo as an alternative.
It's a lot cheaper.
It is good enough to use, but lacks a few Photoshop features.
My current plan is to use CS5 until it stops working due to operating system changes.
By then, I hope Affinity Photo has all the features I depend on.
Affinity Photo as an alternative.
It's a lot cheaper.
It is good enough to use, but lacks a few Photoshop features.
My current plan is to use CS5 until it stops working due to operating system changes.
By then, I hope Affinity Photo has all the features I depend on.
Read The Manual
The Photoshop manual has lots of information on scanning and color management. I won't repeat it or try to summarize it here. RTFM.
Input
I have used several different ways of getting my pictures into the computer.
-
Scanning. It used to be conventional wisdom to scan at twice the target DPI, so 144 DPI given that web display is nominally 72 DPI. Scanner drivers have improved a lot since then, and scanning at 72 DPI is now OK if you are going to shrink the scanned picture. (The basic idea is that you don't want to try to make more pixels in Photoshop than you got from your input source.) Some scanner drivers have built-in sharpening and color correction: again, it used to be best to turn these off and use Photoshop's more sophisticated features, but now drivers have improved and these features may be acceptable. Experiment if you can; otherwise, scan at higher resolution and you can shrink things later. You can scan prictures, slides, or negatives. Good scanners are not expensive.
Epson no longer updates the driver software for my scanner. I bought Ed Hamrick's VueScan and it works fine.
-
Scanning services. You send film, or slides, or negatives, or prints to these services, and they scan them. You can then download the images, or order copies on CDs. I have used several of these services.
 ScanCafe scanned hundreds of old slides for me at a good price: took about 6 weeks.
-
Digital camera. A digital camera produces picture files you can load onto your computer without a scanning step. Cameras vary widely in optical quality and features. One factor in
choosing a camera is the number of pixels, but there are many others.
I can't go into all the factors: do some research.
Modern digital cameras do significant adjustment and processing onboard, and may make some kinds of Photoshop adjustment unnecessary.
The camera I use (Nikon) produces a pre-sharpened JPG file with more pixels than I need for web pictures,
so I read it into Photoshop and adjust the size.
Modern phone cameras can take decent pictures too.
Processing
Target device
In order to prepare your pictures for web use, you need to make some decisions about who's going to look at the pictures. The variables are
-
Average user's bandwidth (line speed). Are your web pages intended mostly for people who use high-speed connections?
-
User patience and interest in your page.
Decide what image size (in pixels) you want before you start, based on your page design. You may wish to have a small version, or thumbnail image, that the user can click to see a larger image. If you are designing for mobile phones, you should decide whether you expect the user to zoom or slide the picture.
Also decide what file size you want your picture to take up. The size of a picture not only uses up disk storage on your web server account, but also consumes download time. There's a tradeoff between picture size, picture quality, and load time: if your page loads too slowly, viewers will leave without looking. My rule of thumb is that a picture that's the only thing on a page can be up to 75 or 80K, but small inline pictures should be much smaller. Aim for 20K or less. There are tools on the web that will test a page's loading speed: try them out.
Storage format is the fourth variable in the tradeoff. JPG compresses photographs better than GIF, so I use it for most photographs.
Steps
Here are the steps I use:
-
Read the picture in. The way you do this depends on your source. Get your image into RGB mode.
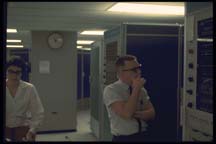
Original image from a PhotoCD. This one is so dark I can't see to crop or straighten
-
Straighten your picture. I often have trouble keeping the horizon level. The Filter/Lens Correction filter in CS5 has a quick way to straighten pictures. Just draw along a line in your picture and the whole image will be rotated to make it horizontal or vertical. By selecting "Custom" you can also cure various kinds of distortion. You can teach Lens Correction about your lens, and it will automatically correct pincushion/barrel distortion at different focal length settings.
-
Crop your picture to focus on its strong points with the Crop tool. I had to crop the example image because the PhotoCD image had fuzzy edges.
-
The Image/Adjust/Curves control can adjust levels and contrast, either for all colors or for a single color. Anything you can do in Levels, you can do in Curves, plus a whole lot more.
You will see the histogram of your picture. If there are parts on the right where the histogram is zero or almost zero, pull the upper right corner to the left to eliminate these values from the gamut. If there are parts on the left where the histogram is zero or almost zero, pull the lower left corner to the right to eliminate these values from the gamut. This operation is basically the equivalent of an Auto Levels operation.
If the photo has a color cast, for instance due to fluorescent light, try clicking the center eyedropper, and then clicking on something that should be a neutral gray. If you don't like what it did, you can undo this change.
To bring out detail in the middle tones of a picture, lightening the whole picture at the expense of some detail in the highlights and shadows, pull the center of the curve up and to the left, making the curve into a concave-downward shape. This is often good for snapshots and flash pictures.
To increase the contrast in a picture, making the light areas lighter and the darks darker, you can make the curve take an s-shape by pinning the center and then pulling the upper half up. I use this to make shapes and patterns more dramatic.
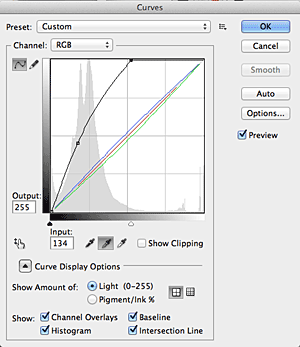
Curves control panel after adjustment.
Finally click OK. Use the tool very cautiously.. a little motion has a big effect.
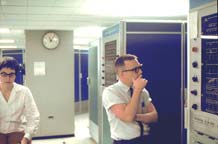
The picture after straightening, cropping, and curves.
-
Other editing. If you want to remove an unwanted wire, blemish, or background from your picture, using the many tools Photoshop provides, do this now. The Clone tool is especially useful here.
-
Size the picture. Use Image/Adjust/Image Size to resize your picture. Tell it to resample and constrain proportions. I assume you are working with more pixels than you need. Resizing smaller will discard pixels and resample, and Photoshop is far better at this than other picture manipulation tools. You want to have done your Levels work before you do this, so that resampling will have an easier job. (Don't try to take a little picture and resize it bigger.)
-
Sharpen or Unsharp Mask. After you resize, you will want to sharpen the picture. Filter/Smart Sharpen usually works for me. Percentage should probably be between 50 and 100 for Web page use. Too much and you get white halos around every edge.

Unsharp Mask control panel.
-
Save for Web and Devices. I save my pictures as JPGs, usually 30 quality. Photoshop's Save For Web control lets you experiment with various modes and parameters of saving, and shows what the size and final appearance will be. Some pictures need higher quality to avoid funny JPG artifacts in large flat areas like sky. Other pictures look just the same at quality 3 as they do at 30, and take much less storage.
Never modify the original file: write your saved-for-web file to a different directory, and name it something useful for later use. Keep the original file so you can re-process it with future programs. Once you have shrunk your image by resizing and compressing, you have discarded information from the original.
-
Check Your Work. Until you've done a bunch of picture conversions, it's important to check your results on both PC and Mac, using various screen resolutions and browsers, on LCD and regular video screens, using a dialup line. Sometimes what looked great in Photoshop doesn't look so good in a browser: sometimes when you load your page from the server, you find that it takes too long.
on a hi-res display this should look sharper. See below.
High-Resolution Displays
Device Pixels, Image Pixels, and CSS Pixels
Standard advice for coding HTML is to always specify WIDTH and HEIGHT (in CSS pixels) on an IMG tag, so that page layout does not need to wait for the image to be read in to determine its size. For example:
<img alt="breakpoint" src="stack4_db_break.jpg" width="488" height="415">
If WIDTH and HEIGHT are specified (in CSS pixels) in an IMG tag, and the actual dimensions of an image (in image pixels) are different, the browser will stretch or shrink the image (choosing the right number of device pixels) to fit it into the specified size. The CSS standard specifies that there are 96 CSS pixels per inch. Some modern computers have higher resolution screens: for example, an Apple MacBook Pro with "Retina" screen has about 220 device pixels per inch.
To make an image look sharper on computers with a higher-resolution display
Save the image with twice the number of image pixels, and then in the IMG tag specify WIDTH and HEIGHT half the image's pixel size. On a high resolution screen, a modern browser will try to display the image to fit in the specified space... and it will use the "extra" pixels. On a lower resolution screen, the browser will have to discard three pixels for each one it displays, and the image won't look as sharp. Use the SRCSET attribute to tell the browser to load a version of an image with more pixels only if the display can use the pixels.
Advice on stretching and shrinking
Asking a browser to stretch a picture by putting a number in the WIDTH or HEIGHT that is bigger than the picture's actual size in pixels will often cause an ugly blurry mess. Don't do it, unless you are stretching a 1x1 pixel graphic to make a bar chart.
If you use a graphic editor to shrink a picture, discarding some pixels, remember to Sharpen after you resize. Try different sharpening tools to get the best effect: in Photoshop I use "Smart Sharpen."
Automation
I make my standard pattern into two Actions, one for landscape pictures and one for portrait, and invoke the macro after Lens Correction, cropping, and Curves. If I like the result, I'm done. If not, I go back to Open in the history window, and do the steps one at a time, inserting variations and experimenting.
Other Things to Try
Saturation
Some pictures scanned from film look washed out and are improved by increasing the color saturation and constrast a little.
Selections
You can select just part of your image and apply different corrections to individual parts. One of the Photoshop advice sites cautions that this may produce pictures that look unnatural: human perception is quite sensitive to mismatches between parts of a picture that should have the same illumination.
Despeckle
For scanned pictures, sometimes it helps to use the Filter/Noise/Despeckle filter before sharpening. Most other filters besides the sharpening filters will make the picture look interesting, and worse than the original.
Other Controls
Channels and layer masking are a mystery to me. I've never found a way to use them to improve a picture. Easy to make a picture look worse though, in many different ways.
Thumbnails
I used to use Photoshop to make thumbnail images of pictures for web galleries.
I switched to ![]() ImageMagick, a powerful package that contains many useful picture whacking tools:
in particular, it provides the convert command, which I use as follows:
ImageMagick, a powerful package that contains many useful picture whacking tools:
in particular, it provides the convert command, which I use as follows:
convert -geometry 60 blah.jpg ../thumbs/blah.jpg
assuming it's a landscape-oriented picture. "60" is the width in image pixels. For a portrait-orientation picture, use "x60". convert has many more options.
Non-Graphic Users
Some users run with images disabled or are unable to see pictures. It is a courtesy to these users to provide enough text that they can at least navigate your page, and to use ALT and TITLE tags and descriptive text to allow them to get your message.
References
There's plenty of information on the Web about preparing graphics for online use. Use a search engine to look for it.
Vincent Flanders has a useful list of links to information about graphics on his ![]() Web Pages that Suck.
Web Pages that Suck.
Copyright (c) 1995-2024 by Tom Van Vleck.